Create a Bucket
Full and Cluster Administrators can use Couchbase Web Console, the CLI, or the REST API to create a bucket.
You can create a bucket with the Couchbase Server UI, CLI or the REST API.
You can create a maximum of 30 buckets per cluster.
Create a Bucket with the UI
To create a bucket with the Couchbase UI:
-
Log in to the Couchbase Server Web Console.
-
Select Add Bucket.
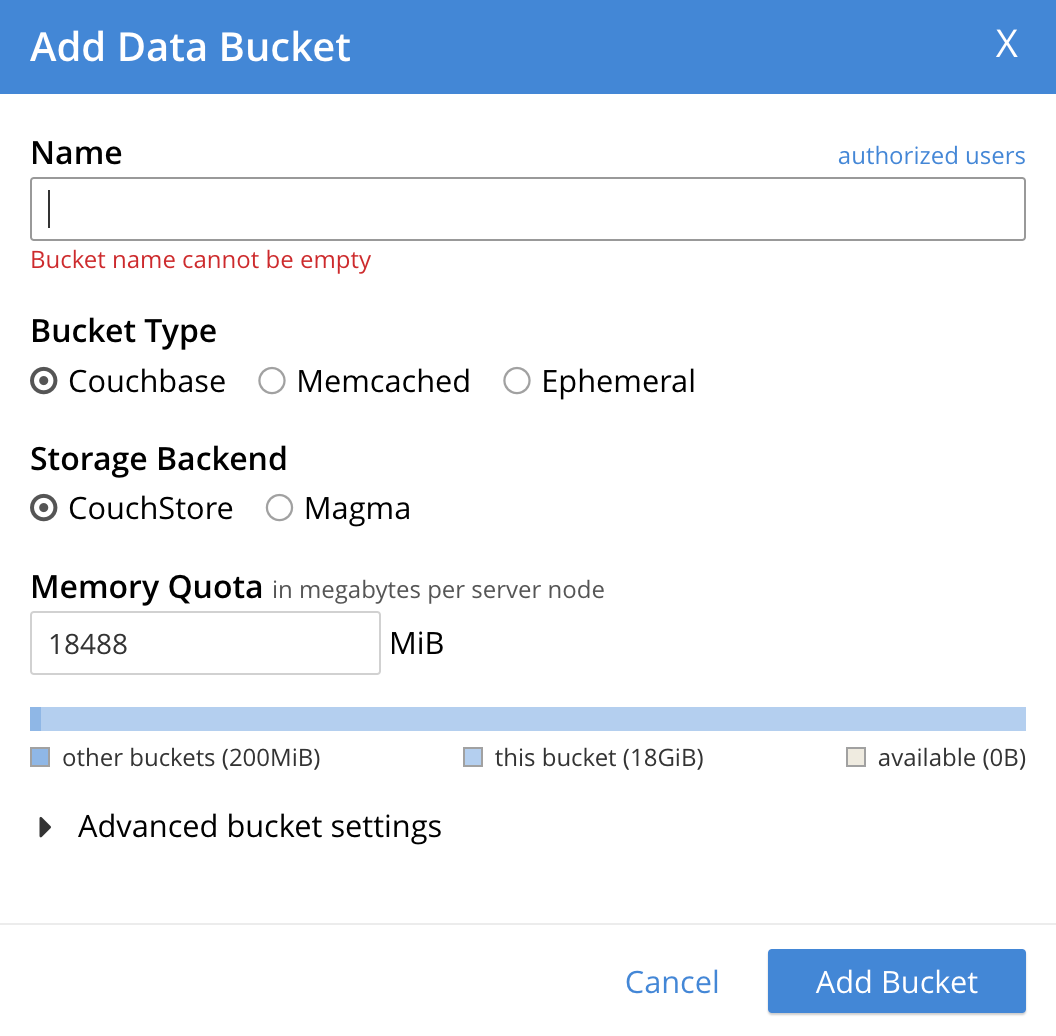
The Add Data Bucket dialog appears:

-
In the Name field, enter a name for the new bucket.
A bucket name can be up to 100 characters in length and contain:
-
Uppercase and lowercase characters (A-Z and a-z)
-
Digits (0-9)
-
Underscores (_), periods (.), dashes (-), and percent symbols (%)
-
-
Choose a Bucket Type for the bucket:
-
Couchbase
-
Memcached
-
Ephemeral
For more information about bucket types, see Buckets.
-
-
Choose a Storage Backend for the bucket:
-
Couchstore
-
Magma
For more information about the available storage engines, see Storage Engines.
-
-
In the Memory Quota field, enter a value in MiB per node for the total RAM available for the bucket. This value can’t exceed the total RAM quota for your cluster.
Your memory quota needs to match the minimum memory resident ratio required by your chosen storage engine. For more information, see Bucket Memory Quotas.
-
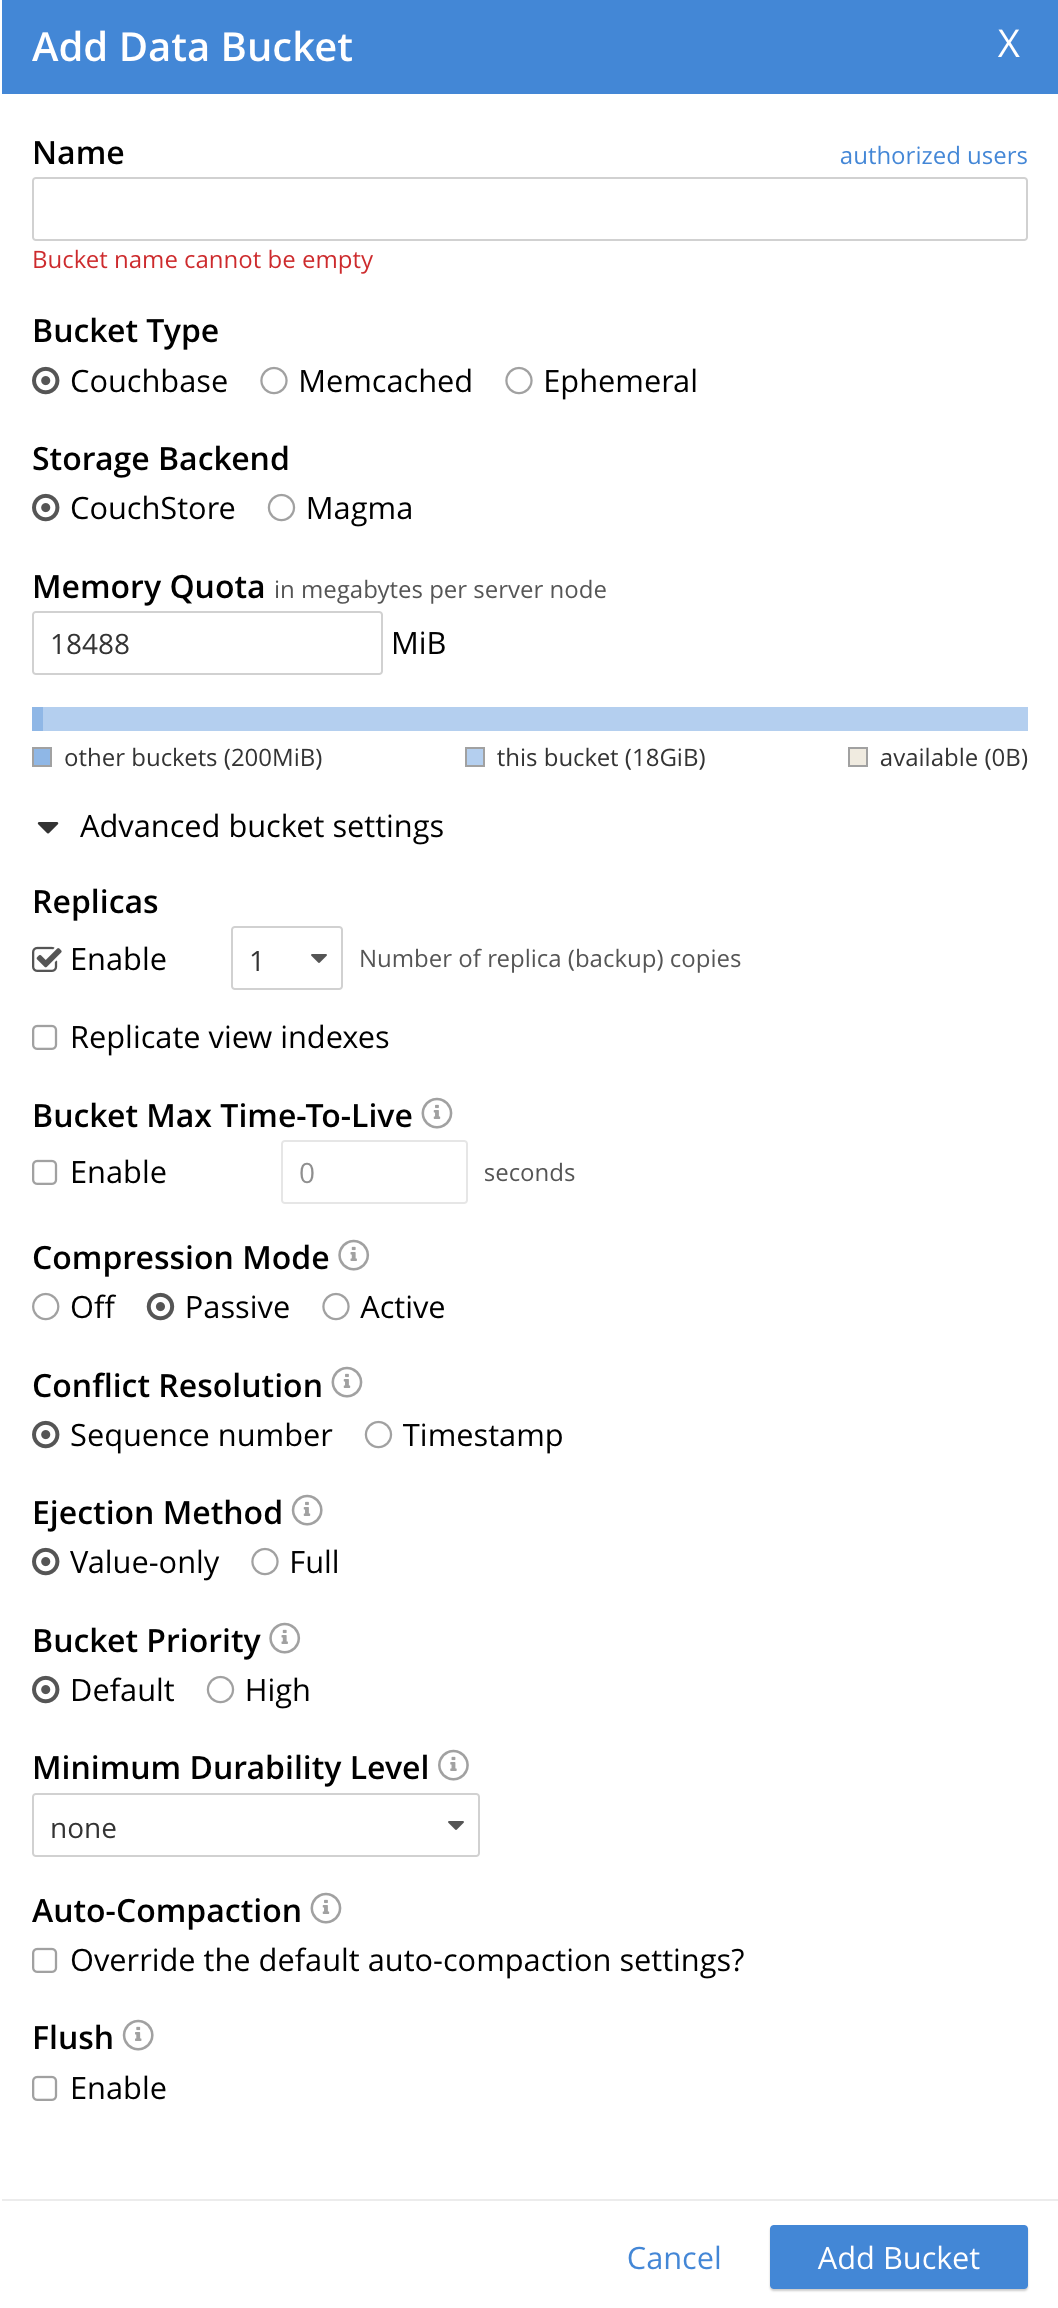
Expand Advanced bucket settings.
-
Set any advanced settings for your bucket. See Set Advanced Bucket Settings.
-
Select Add Bucket.
The bucket appears on the Buckets screen.

You can view the following information for the bucket:
-
The number of items the bucket contains.
-
The percentage of items in the bucket that are currently resident.
-
The number of operations per second being performed on the bucket.
-
The amount of RAM the bucket is currently using, compared to its memory quota.
-
The amount of disk space used by the bucket.
You can also view the Documents in the bucket and create Scopes and Collections.
For information about how to import documents into a bucket, see Import Documents.
Set Advanced Bucket Settings
The available advanced settings for your bucket change based on your selected Bucket Type:
Couchbase Bucket Settings
To configure advanced settings for a Couchbase bucket:
-
To enable replica creation and management, under Replicas, select the Enable checkbox.
-
In the Number of replica (backup) copies list, select the number of replicas for the bucket. Note that if a required minimum for the configurable number of replicas has previously been established by an administrator, an attempt to specify a lower number produces the error message Replica number must be equal to or greater than x, where x is the minimum number of replicas. For information on establishing a minimum, see the REST API reference page, Setting a Replica-Minimum.
-
To replicate view indexes and data from the bucket, select the Replicate view indexes checkbox.
-
-
To set a document expiration for documents in the bucket, under Bucket Max Time-To-Live, select the Enable checkbox.
-
In the Seconds field, enter the maximum time in seconds that a document can exist in the bucket before it’s deleted.
The maximum allowed value is 2147483648 seconds (68.096 years). You can only apply this setting to documents created after you change the configuration.
-
-
Choose a Compression Mode for the bucket:
-
Off
-
Passive
-
Active
For more information about the available compression modes, see Compression.
-
-
Choose a Conflict Resolution method for Cross Datacenter Replication (XDCR) on this bucket:
-
Sequence number
-
Timestamp
For more information about XDCR conflict resolution, see XDCR Conflict Resolution.
-
-
Choose an Ejection Method for the bucket:
-
Value-only
-
Full
For more information about ejection, see the Ejection section in Memory.
-
|
Full Ejection is recommended when the Magma storage engine is used as the storage engine for a bucket. This is especially the case when the ratio of memory to data is very low (Magma allows you to go as low as 1% of memory to data ratio). |
-
Choose a Bucket Priority for the bucket:
-
Default
-
High
Bucket Priority sets the priority of the bucket’s background tasks relative to the background tasks of other buckets on the cluster.
-
Background tasks may involve disk I/O, DCP stream-processing, item-paging, and more. Specifying High might result in faster processing for the current bucket’s tasks. This setting only takes effect when there is more than one bucket defined for the cluster, and you have assigned different Bucket Priority values.
-
In the Minimum Durability Level list, select a durability level for the bucket:
-
none
-
majority
-
majorityAndPersistActive
-
persistToMajority
For more information about durability, see Durability.
-
-
To enable automatic compaction of data and indexes to save space, select the Auto-Compaction checkbox.
-
To override the default Auto-Compaction settings, select the Override the default auto-compaction settings? checkbox.
For more information about how to configure Auto-Compaction, see Auto-Compaction.
-
-
To enable flushing for the bucket, under Flush, select the Enable checkbox.
For more information about flushing, see Flush a Bucket.

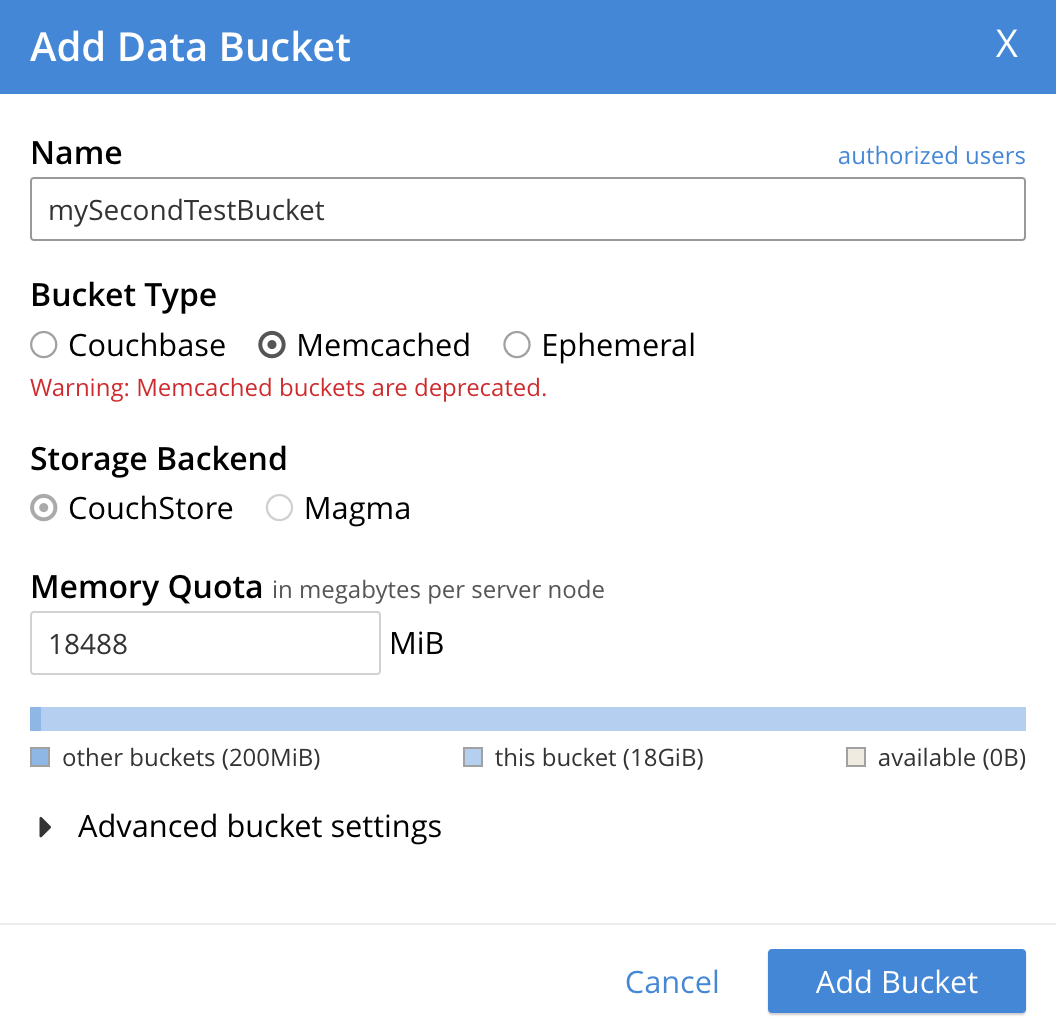
Memcached Bucket Settings
| Memcached buckets are deprecated. Use a Couchbase or Ephemeral bucket, instead. |
To configure advanced settings for a Memcached bucket:
-
To enable flushing for the bucket, under Flush, select the Enable checkbox.
For more information about flushing, see Flush a Bucket.

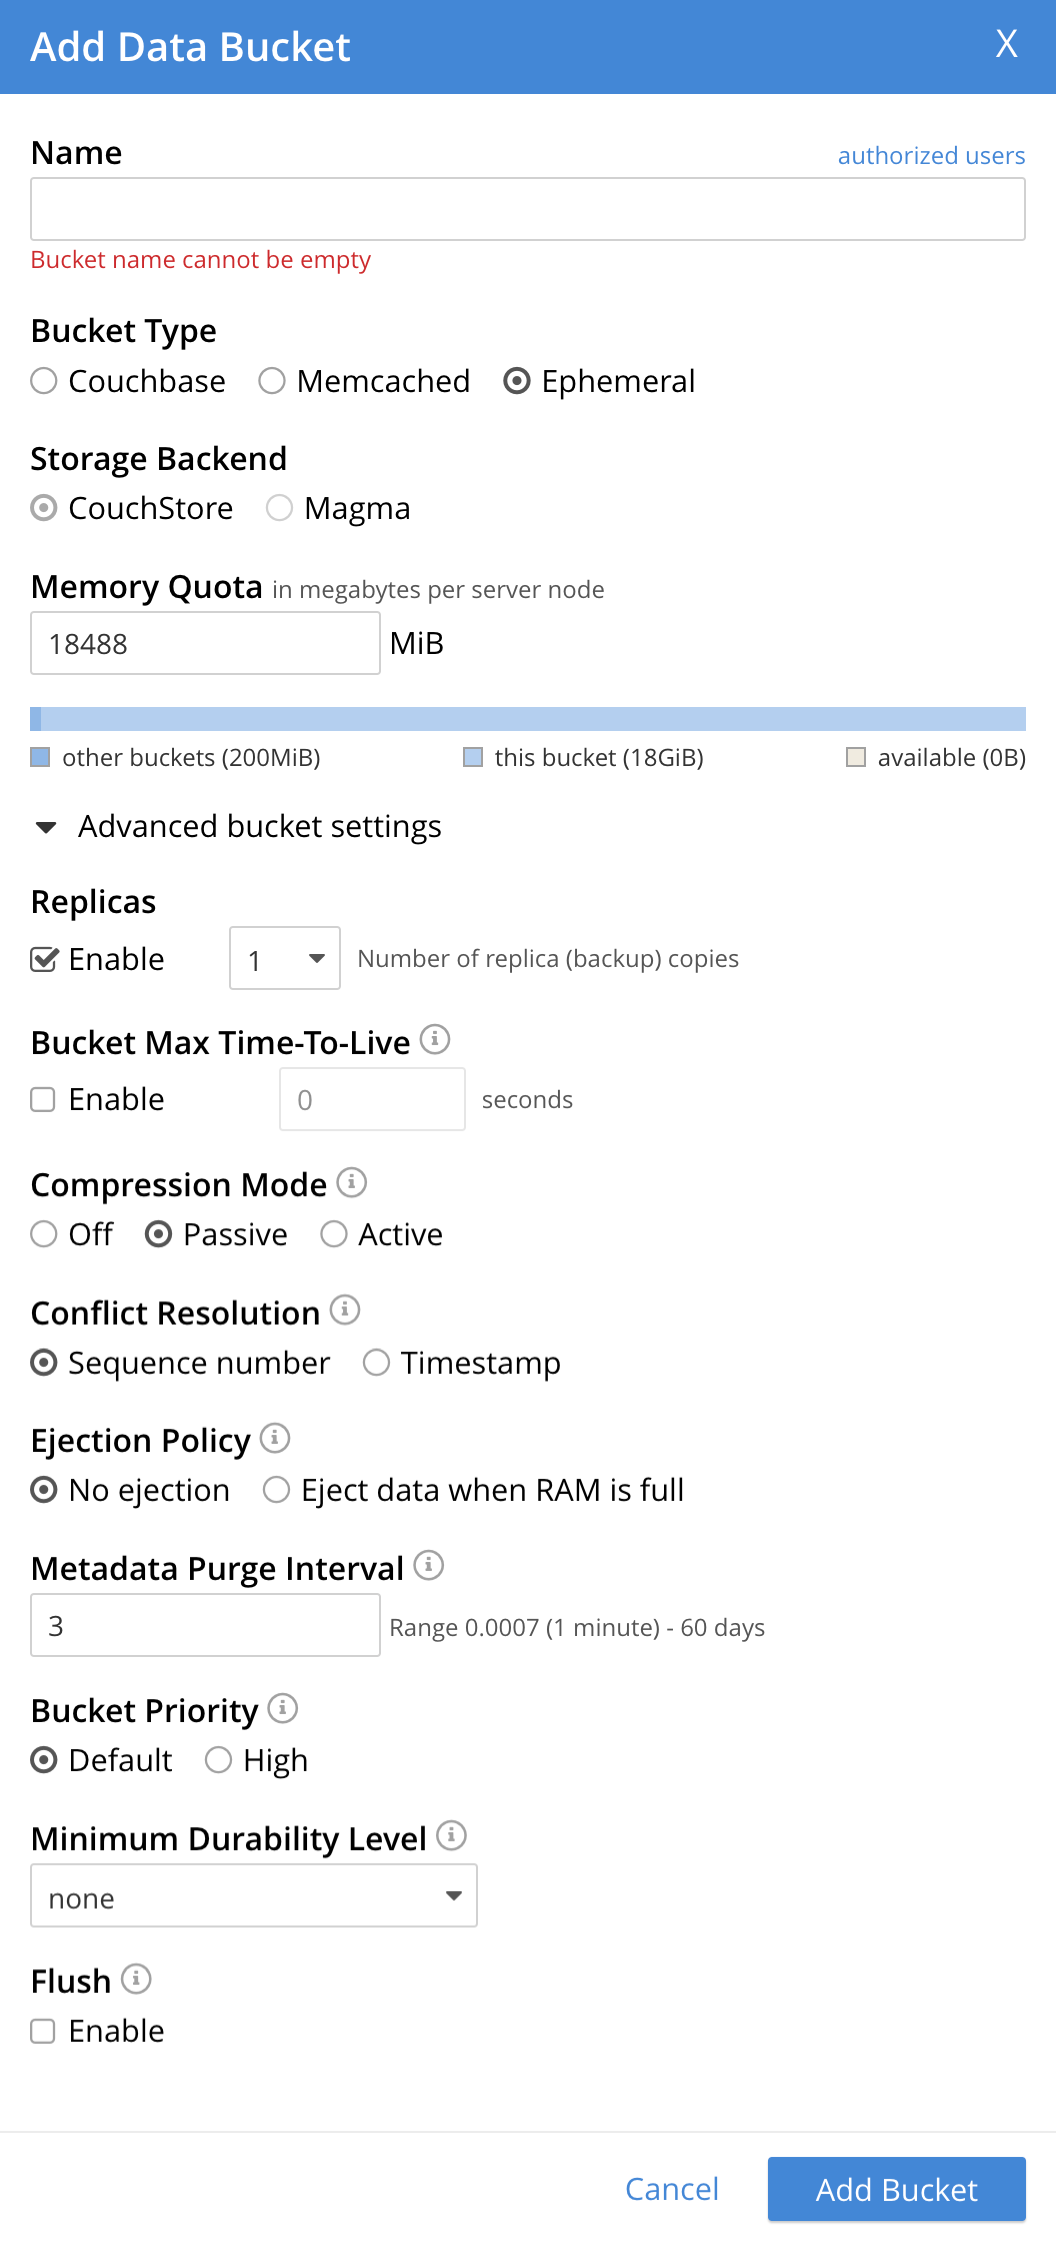
Ephemeral Bucket Settings
To configure advanced settings for an Ephemeral bucket:
-
To enable replica creation and management, under Replicas, select the Enable checkbox.
-
In the Number of replica (backup) copies list, select the number of replicas for the bucket.
-
-
To set a document expiration for documents in the bucket, under Bucket Max Time-To-Live, select the Enable checkbox.
-
In the Seconds field, enter the maximum number of seconds a document can exist in the bucket before it’s deleted.
The maximum allowed value is 2147483648 seconds (68.096 years). You can only apply this setting to documents created after you change the configuration.
-
-
Choose a Compression Mode for the bucket:
-
Off
-
Passive
-
Active
For more information about the available compression modes, see Compression.
-
-
Choose a Conflict Resolution method for Cross Datacenter Replication (XDCR) on this bucket:
-
Sequence number
-
Timestamp
For more information about XDCR conflict resolution, see XDCR Conflict Resolution.
-
-
Choose a Bucket Priority:
-
Default
-
High
Bucket Priority sets the priority of the bucket’s background tasks relative to the background tasks of other buckets on the cluster.
-
Background tasks may involve DCP stream-processing, item-paging, and more. Specifying High might result in faster processing for the current bucket’s tasks. This setting only takes effect when there is more than one bucket defined for the cluster, and the buckets are assigned different Bucket Priority values.
-
Choose an Ejection Policy for the bucket:
-
No ejection
-
Eject data when RAM is full
For more information about ejection, see the Ejection section in Memory.
-
-
In the Metadata Purge Interval field, enter a value between
0.0007-60to set how often a node purges metadata on deleted items.A value of
0.0007equals a minute. A value of0.5equals 12 hours. If this value is too high, the node might have a delay when reclaiming memory. If set too low, data might be inconsistent in XDCR or Views. -
In the Minimum Durability Level list, select a durability level for the bucket:
-
none
-
majority
For more information about durability, see Durability.
-

Create a Bucket with the CLI
To create a bucket with the Couchbase CLI, use the bucket-create command.
For example:
./couchbase-cli bucket-create \
--cluster 10.143.201.101:8091 \
--username Administrator \
--password password \
--bucket testBucket \
--bucket-type couchbase \
--bucket-ramsize 1024 \
--max-ttl 500000000 \
--durability-min-level persistToMajority \
--enable-flush 0
The preceding example creates a Couchbase bucket named testBucket, with a RAM size of 1024.
It sets a Maximum Time-to-Live and disables Flush.
It also sets a Minimum Durability Level of persistToMajority.
For more information about bucket-create and its parameters, see bucket-create in the Couchbase CLI reference.
Create a Bucket with the REST API
To create a bucket with the Couchbase REST API, use the POST http method, with the /pools/default/buckets endpoint.
For example:
curl -v -X POST http://10.143.201.101:8091/pools/default/buckets \
-u Administrator:password \
-d name=testBucket \
-d bucketType=couchbase \
-d ramQuota=512 \
-d durabilityMinLevel=majorityAndPersistActive
The preceding example creates a Couchbase bucket named testBucket, with a RAM size of 512.
It sets a Minimum Durability Level of majorityAndPersistActive.
For more information about the /pools/default/buckets endpoint and its parameters, see Creating and Editing Buckets in the Buckets API reference.