Setting Up Secure Connections
Configure the connector to encrypt data in transit.
By default, the connector talks to Couchbase and Elasticsearch over unencrypted socket connections. If encryption is required, you can configure the connector to use TLS/SSL.
Overview
Couchbase Server and Elasticsearch both use a root certificate to generate a certificate for each node in the respective cluster.
This guide shows how to obtain the root certificates, and how to tell the connector it should trust these certificates when establishing secure connections.
Pre-requisites
During the setup process you’ll need access to the Java keytool command.
This command is included in standard Java distributions under $JAVA_HOME/bin.
Couchbase Server Enterprise Edition is required in order to connect to Couchbase over an encrypted connection. Enterprise Edition may be downloaded and evaluated for free. During the download process, see the license agreement for details about commercial use.
Similarly, versions of Elasticsearch prior to 6.8 and 7.1 require an additional license in order to support secure connections. A trial license can be activated by modifying a configuration setting, as explained in the Elasticsearch documentation linked below.
Get the Couchbase CA Certificate
The steps for getting the Couchbase certificate are different depending on whether you are hosting your own Couchbase Server cluster or using Couchbase Cloud.
Couchbase Server (Self-hosted)
How to get the certificate for a Couchbase Server cluster you have deployed yourself.
Open the Couchbase Admin Console web UI and click on Security in the navigation sidebar. Then click Root Certificate in the sub-section navigation bar along the top of the page.
| You might see a warning that Couchbase is using a self-signed certificate. That’s fine. This certificate will be added to the connector’s trust store, so it will be trusted regardless of who signed it. |
Copy the certificate into a plain text file.
The filename does not matter, but let’s call it couchbase.pem.
To use a different root certificate, you can follow instructions on the Configure Server Certificates page.
Couchbase Cloud
How to get the certificate for a Couchbase Cloud cluster.
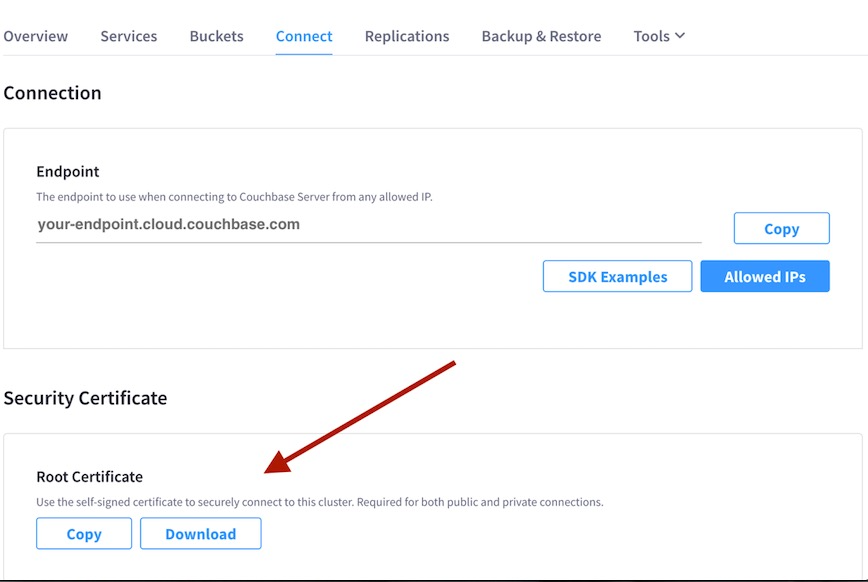
Once you have created a Cluster in Couchbase Cloud, navigate to the Connect tab and download the security certificate.

Rename the downloaded file to couchbase.pem. (The name doesn’t really matter, but the rest of this guide refers to the Couchbase certificate file by that name.)
Get the Elasticsearch CA Certificate
Elasticsearch must first be configured to require TLS/SSL. Please refer to the Elasticsearch documentation, specifically Encrypting communications in Elasticsearch. Make sure you also follow the steps for Encrypting HTTP Client Communications.
| Enabling X-Pack on versions of Elasticsearch prior to 6.8 and 7.1 starts a trial period. When the trial period expires, functionality is degraded unless a license is purchased from Elastic. See Configuring security in Elasticsearch for details. |
As you follow the instructions in the Elasticsearch documentation, you’ll generate a CA certificate for your Elasticsearch cluster (or you might decide to use a well-known public CA, or an internal CA managed by your organization). This CA certificate is the one you’ll add to the connector’s trust store in the next step.
Verify Elasticsearch requires secure connections by opening https://localhost:9200 in your web browser.
(You might get a warning about an untrusted or self-signed certificate).
You should be prompted for your Elasticsearch credentials, which default to username elastic with password changeme.
Amazon Elasticsearch Service
The certificates generated by the Amazon Elasticsearch Service are signed by a well-known certificate authority.
When connecting to an instance of the Amazon Elasticsearch Service, you may use the default trust store included with the Java runtime (assuming your Java installation is up-to-date).
This trust store file is usually named cacerts and lives somewhere under $JAVA_HOME.
Alternatively, the Amazon CA certificate may be downloaded from Amazon Trust Services.
Add Certificates to the Trust Store
The connector’s trust store is a Java keystore file or PKCS12 bundle containing the certificates the connector should trust.
We’ll use the Java keytool command to create a keystore and populate it with the root certificates for Couchbase and/or Elasticsearch.
To add the Couchbase root certificate:
keytool -importcert -keystore truststore.jks -file couchbase.pem
If the keystore file truststore.jks does not yet exist, you will be prompted to choose a password for the new keystore.
Otherwise, you will be prompted for the password of the existing keystore.
You will then be presented with a summary of the information in the certificate, and asked if you want to trust the certificate.
If the information is correct, enter y to confirm.
Run the keytool command again, replacing couchbase.pem with the path to the Elasticsearch root certificate.
Configure the Connector
You’re almost done. Now that you have a keystore file containing the CA certificates used by Couchbase and Elasticsearch, you need to tell the connector where to find it.
Edit your connector configuration file and search for the [truststore] section. Change the associated path property to match the path to the keystore file.
A relative path will be resolved using the connector installation directory as the base.
This means you can put the truststore.jks file into the connector installation’s config subdirectory, and set the path property to 'config/truststore.jks'.
|
Next, search for the [couchbase] section and set the secureConnection property to true.
Do the same thing in the [elasticsearch] section.
Finally, in your connector installation directory, edit the file secrets/truststore-password.toml and update it with the password you chose.